Since the first release of Counter-Strike, players have tried to optimize the game for maximum competitive advantages. With CS:GO, this is no different, and the game offers a lot more customizations than can be found in the in-game settings. Most people would be surprised by the capabilities of the config file. Most people have grown up with modern games, where most of the configurations were done in the settings and no further tweaking was possible.
The CS:GO developers are moving towards more customizations via the in-game settings, but to this day, there are still some settings that are only available via the config and autoexec files.
In this guide, you will learn what a config and autoexec cfg file is, and how to create an autoexec yourself. We will also go into some of the useful commands you can put in your autoexec, and what configs professional players are using.
What is a config file in CS:GO?
The config file is automatically created when you play CS:GO. It stores all your keybindings and various settings you make in-game.
The full name of the file is config.cfg. The cfg extension, indicates that it is a config file, and several config files exist in your CS:GO library.
The config file is located in the “cfg” directory in CS:GO. The path to the config.cfg file is:
\Steam\steamapps\common\Counter-Strike Global Offensive\csgo\cfg
In some cases, the path might be a little bit different.
For an example of a config file, you can check out s1mple’s CS:GO config.
It is not recommended to put your individual customizations into this file, as it might get overwritten by CS:GO. Instead, you should create what is called an autoexec.cfg file.
What is an Autoexec file in CS:GO?
An autoexec file is like a config file, it stores all your personal keybinds and settings for CS:GO. Autoexec stands for “Auto Execution”, which means that it is a config file, that is automatically executed (run) when you start a game.
Unlike the config.cfg file, it is not automatically created, and you will have to make it yourself.
The full name of the file is autoexec.cfg.
The autoexec file should be placed in the same folder as your config.cfg file in order to work.
Path to autoexec file:
\Steam\steamapps\common\Counter-Strike Global Offensive\csgo\cfg
If you are having trouble finding your config files, there is an easy way to locate the cfg folder.
How to locate your cfg folder in CS:GO
Follow these simple steps to locate your CS:GO config folder.
1. Start your Steam client
2. Go to your “LIBRARY” in the Steam client
3. In the games section, locate Counter-Strike: Global Offensive, right-click on it and select “Properties…”
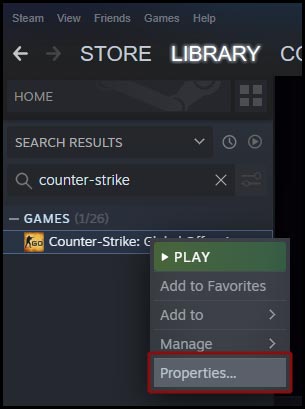
4. In the Properties pop-up box, click on “BROWSE LOCAL FILES…”
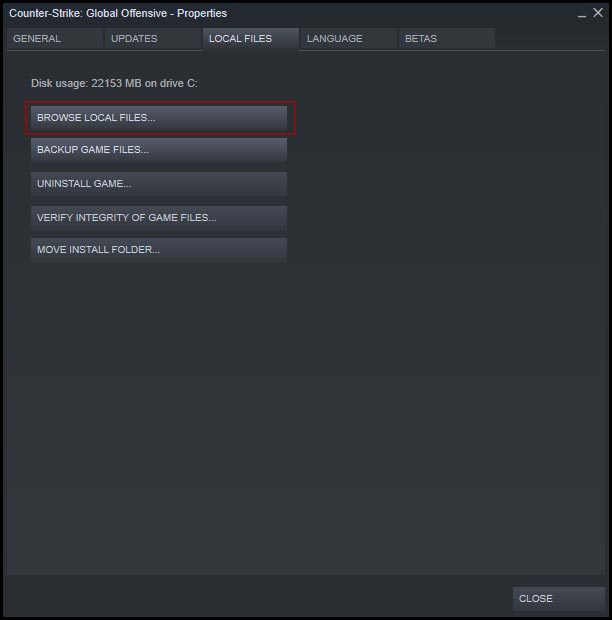
5. The Counter-Strike Global Offensive Steam files will now open. Navigate to:
\csgo\cfg
6. Congratulations, all your CS:GO config files are located here.
You are now ready to create your own Autoexec file.
How to create an Autoexec file in CS:GO
Creating an Autoexec file is straightforward, the only thing you need is a text editor. For this, any text editor will do. For example, you can you Windows built-in text editor called Notepad, or you download the more advanced Notepad++. What you choose, is completely up to you.
There are several ways that you can create an Autoexec file, here two different methods are shown.
Method 1
1. Navigate to your cfg folder, if you don’t there where it is located read the steps above in “How to locate your cfg folder in CS:GO”.
Usually, the cfg directory it is located here:
C:\Program Files\Steam\steamapps\common\Counter-Strike Global Offensive\csgo\cfg
2. Right-click in the folder window, from the dropdown menu, select New > Text Document
3. Rename the new text document to autoexec.cfg. Make sure the extension is, in fact, .cfg and not .txt

4. That’s it, your autoexec is (almost) ready – see “Last Step” below.
Method 2
Method two is good if you are having trouble with the file extension (e.g. if you have hidden file extensions).
1. Open up a text editor, for example, Notepad.
2. In the menu, click on File > Save As…
3. Save the file with the following settings:
- File name: autoexec.cfg
- Save as type: All Files (*.*)
Save it in the CS:GO cfg folder.
4. You have created your personal autoexec file.
Last step
Sometimes your autoexec file will not be loaded automatically due to a bug. To prevent this, open up your autoexec.cfg file and add the following line to the end of the autoexec file:
host_writeconfig
Save the file when you have added the line. Make sure that you add future edits above this line.
If your autoexec won’t load on startup
If you added host_wirteconfig to your autoexec, but it is still not loaded at startup, there are a few workarounds that you can try.
- Add “exec autoexec” at the end of your default config.cfg file (located in the cfg folder).
- Add “+exec autoexec” to your Counter-Strike: Global Offensive launch options.
How to use an autoexec file in CS:GO
Your autoexec file should automatically be loaded whenever you start CS:GO. However, if this is not the case, you can automatically activate it via the console.
Simply type the following command in the console to load your autoexec:
exec autoexec
If you are making changes to your autoexec while you are in-game, you will also need to reload the autoexec with the same command.
The autoexec file can hold all your personal key bindings, settings, cvars and other things.
You can also create other config files, that you want to use in various scenarios. A good example of this is a practice config, that you are using while practicing against bots, spray patterns, smoke grenades and so on.
The steps to create a practice config is the same, you just call the config file something else, for example, practice.cfg, and place it in the CS:GO cfg folder. Whenever you want to load your practice config, you open up your console and type exec practice, or exec practice.cfg.
This way, you have various config files for different scenarios.
How to activate and open the console in CS:GO
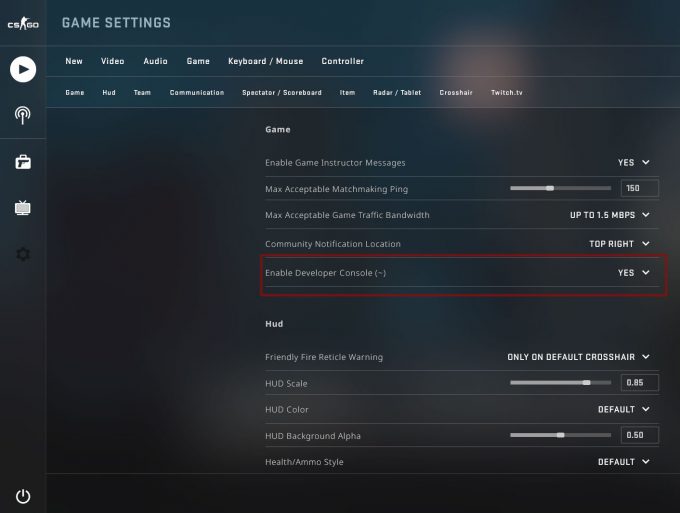
To gain access to the developer console in CS:GO, you need to have it activated. To activate the console is pretty simple:
- Open CS:GO
- Go to game settings
- Set “Enable Developer Console (~)” to YES.
To open the console, just press ~ on your keyboard. For some regions, the key can be different, check your key bind in the settings for the exact key.
What can autoexec be used for
In the autoexec file, you can store your personal settings, key bindings, and console commands. I am tempted to say that the possibilities are endless, and there is no autoexec that suits everyone.
In the below section, we will go deeper into what an autoexec file can be used for in CS:GO. If you want more inspiration, check out the full list of CS:GO console commands.
The best autoexec config file for CS:GO
To say that someone had the best autoexec in CS:GO would be a very bold claim. Professional players use different autoexec settings, and what is best for you might be different.
What we can suggest, is that you consider putting some of the following settings in your autoexec:
- Crosshair settings
- ViewModel settings
- Radar settings
- Customized key binds
- Toggles
CS:GO Crosshair Config
The crosshair can now easily be customized inside CS:GO. However, if you still want to tweak your crosshair via config files, you can use the following settings:
cl_crosshaircolor "5"
 cl_crosshairalpha "255"
 cl_crosshairdot "1";
 cl_crosshairsize "2";
 cl_crosshairstyle "2";
 cl_crosshairthickness "0.5";
 cl_crosshairusealpha "1";
 cl_crosshair_drawoutline "0";
 cl_crosshairgap "-2.5";
 cl_crosshair_dynamic_maxdist_splitratio "0";
 cl_crosshair_dynamic_splitalpha_innermod "1";
 cl_crosshair_dynamic_splitalpha_outermod "0.3";
 cl_crosshair_dynamic_splitdist "3";
 cl_crosshair_outlinethickness "0";
CS:GO ViewModel Config
the ViewModel is the visible part of your player, which is the hands/gloves and your weapon.
To make the ViewModel take up the least space of your screen, you can use the following ViewModel settings:
cl_righthand "1"
 viewmodel_offset_x "0"
 viewmodel_offset_y "-2"
 viewmodel_offset_z "-2"
 viewmodel_fov "54"
 cl_bobamt_lat "0.1"
 cl_bobamt_vert "0.1"
 cl_bobcycle "0.1"
 cl_viewmodel_shift_left_amt "0.5"
 cl_viewmodel_shift_right_amt "0.5"
 viewmodel_presetpos "0"
CS:GO Radar Config
The default radar in CS:GO is not very useful. It is zoomed in on the player, and you don’t get the full map overview. The following settings will give you a full map overview, so you are able to see where your teammates have spotted enemies and react much faster on rotates.
cl_radar_always_centered "0"
 cl_radar_scale 0.3
 cl_radar_rotate "1"
 cl_radar_icon_scale_min "1"
 cl_hud_radar_scale "1.15"
 cl_hud_bomb_under_radar "0"
Autoexec config files from professional CS:GO players
If you need some inspiration, we can recommend that you check out our list of professional CS:GO players – The CS:GO Pro Settings List.
The list includes almost all the biggest CS:GO pro players, their settings, config files and what gear they are using.
Here are some of the most popular CS:GO pro’s config files:
- s1mple CS:GO config
- dev1ce CS:GO config
- ScreaM CS:GO config
- coldzera CS:GO config
- NiKo CS:GO config
- Stewie2k CS:GO config
- ZywOo CS:GO config
- Twistszz CS:GO config
Practice Config for CS:GO
A practice config, is a special cfg file that you only use while practicing specific stuff offline. For example, people use practice configs to practice smoke grenade throws, spray patterns, recoil control and things like that.
If you want to learn more, then check our guide to the best practice config in CS:GO.
Conclusion
The config and autoexec files in CS:GO are very useful for tweaking settings. Most professional players use a customized config and autoexec file, which they bring with them whenever they have to play CS:GO.
Autoexec can access settings not found in-game settings and give you a small advantage compared to people that are not aware of these settings. That is also why Valve and the CS:GO developers, are making more and more settings available from the in-game options.
To learn more about console commands, we recommend that you read our article on the best sv_cheats console commands.
We hope that you found the guide useful if you have anything to add or would like to show your own settings or autoexec, you are welcome to leave a comment.
